My Attempt at On-Device Machine Learning

In the past few years, on-device machine learning has taken the world by storm (or at least the worlds of some mobile app developers). The innovation — under development at companies like Apple, Google, and Facebook — promises to make any application of machine learning, from object classification to movie recommendation, seamless to experience on a mobile device. The underlying idea is simple: rather than using up ridiculous amounts of data sending files over the internet to be processed, why not do it all on the device itself?
On-device machine learning opens up revolutionary possibilities for apps in every industry. As a spring break project, I decided to explore what it might mean for automated audio identification, which could help those with hearing impairment identify the sounds in their environments. In documenting my progress, I made sure to note challenges and failure as well as achievements and success, so that this report can be as helpful as possible to anyone attempting such a project in the future.
Planning
My goal
To create a mobile app that can identify sounds in a recorded audio clip using machine learning.
My approach
I hoped to use YAMNet, a pretrained machine learning model developed at Google, to run audio classification on an iOS app developed in Swift. The model makes inferences by taking in a WAV file as input and returning the sounds that might be present in the recording (helicopter, guitar, explosion, whistle, etc.).
There are two ways I could go about this:
- On-Device Machine Learning: pre-train a machine-learning model and load it into a device, such as an iPhone or a Raspberry Pi. The model can then make inferences using the computational power of the device itself.
- Traditional Machine Learning: host the machine-learning model on a server, and make requests to the server whenever inference is performed. The server then responds to the request with the results of running the model on the given data.
So what do these two options mean in the context of this project? Traditional machine learning would involve sending a request across the internet every time we need to make inferences (i.e., every time we need to identify the sounds in a recording). On-device machine learning eliminates the need to make these requests, so it is not only faster but also can run offline in areas with no data service.
Given the clear advantages in speed and reliability, I decided to attempt on-device machine learning:
Making the App
1. Install and run the model
For this step, I followed the installation instructions in the YAMNet GitHub repository. Then, I downloaded some sample wav files from free audio sources online (such as this one) to test out the model.
This whole process went smoothly because the installation instructions were clear.
2. Set up an iOS Recording App
Setting up a recording app in Swift was relatively simple, because of how much Apple documentation and Stack Overflow discussions explain the topic. Specifically, I decided to follow this tutorial from The Swift Guy on Youtube (parts one and two). I ended up with a basic recording app that stores and plays back m4a recordings.
This was my first time using Swift and XCode, and I must say I was quite impressed with the simplicity and ease of this work environment (especially the exceptional autocomplete in XCode). If the developer's time is the most important resource in software development, this iOS development environment seems to get the job done.
3. Run the model on the iOS App
Here's where we get into uncharted territory, and where I get to choose from the two options I listed earlier.
For machine learning on an iOS device, the two solutions I tried out were Google's Tensorflow Lite and Apple's Core ML framework. Sparing the details, I did not end up succeeding with either approach, because I was not able to convert the pre-trained YAMNet model, made in Keras, to either a Tensorflow Lite (using TFLiteConverter) or Core ML model (using coremltools in Python). I believe the reason I kept getting errors was because the Keras model loaded pre-trained weights from an h5 file, resulting in a model structure that is slightly different from a freshly trained Keras model. As a result, the conversion libraries, like TFLiteConverter and coremltools, did not recognize the model.
At this point, I could decide either to retrain the entire model and risk it not working either, or pivot to a different approach.
Creating an API
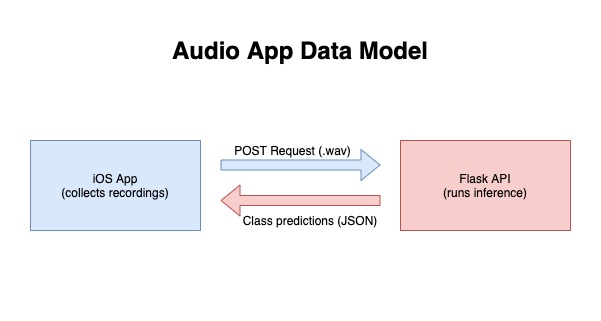
As an alternative to on-device machine learning, I decided to deploy the model as an API using Flask, a lightweight Python library. For an introduction to Flask APIs, check out this tutorial. My API would accept a POST request with a wav file and return the sounds discovered by the model.
Specifically, my function for inference, returning the top five identified classes, was a slightly modified version of the sample prediction function provided in the YAMNet GitHub repository:
    def infer(file):
        graph = tf.Graph()
        with graph.as_default():
            yamnet = yamnet_model.yamnet_frames_model(params)
            yamnet.load_weights('yamnet.h5')
        yamnet_classes = yamnet_model.class_names('yamnet_class_map.csv')

        # Decode the WAV file.
        wav_data, sr = sf.read(io.BytesIO(file), dtype=np.int16)
        assert wav_data.dtype == np.int16, 'Bad sample type: %r' % wav_data.dtype
        waveform = wav_data / 32768.0  # Convert to [-1.0, +1.0]

        # Convert to mono and the sample rate expected by YAMNet.
        if len(waveform.shape) > 1:
            waveform = np.mean(waveform, axis=1)
        if sr != params.SAMPLE_RATE:
            waveform = resampy.resample(waveform, sr, params.SAMPLE_RATE)

        # Predict YAMNet classes.
        # Second output is log-mel-spectrogram array (used for visualizations).
        # (steps=1 is a work around for Keras batching limitations.)
        with graph.as_default():
            scores, _ = yamnet.predict(np.reshape(waveform, [1, -1]), steps=1)
        # Scores is a matrix of (time_frames, num_classes) classifier scores.
        # Average them along time to get an overall classifier output for the clip.
        prediction = np.mean(scores, axis=0)
        # Report the highest-scoring classes and their scores.
        top5_i = np.argsort(prediction)[::-1][:5]
        return {"predictions": [(yamnet_classes[i], str(prediction[i])) for i in top5_i ]}
It loads the model weights, reads in the file, adjusts the data to fit model requirements, makes the prediction, and returns a dictionary of 5 predictions.
Attempting to deploy the API (Unsuccessful)
After making the API, I decided the next step was to deploy it online, so that I could call it from any device. However, due to the extraordinary size of the tensorflow module on Python, the program required over 550 MB of space, which could not be hosted on any free-tier service I experimented with, including Heroku and PythonAnywhere.
Calling the API from the iOS App
Finally, I decided to simply call the API locally from the iOS App, assuming that deploying the API online would be simple if I decided to pursue a paid or more complicated hosting plan.
To call the API, I used the URLSession module in Swift, and simply displayed the response as an alert. My request was as follows:
    func postRequest() {
        let url = URL(string: "http://localhost:5000/api/v1.0/classify")!
        var request = URLRequest(url: url)
        request.setValue("audio/wav", forHTTPHeaderField: "Content-Type")
        request.httpMethod = "POST"

        let filename = getDirectory().appendingPathComponent("\(numberOfRecords).wav")

        let task = URLSession.shared.uploadTask(with: request, fromFile: filename) { data, response, error in
            guard let data = data,
                let response = response as? HTTPURLResponse,
                error == nil else {                                              // check for fundamental networking error
                print("error", error ?? "Unknown error")
                return
            }

            guard (200 ... 299) ~= response.statusCode else {                    // check for http errors
                print("statusCode should be 2xx, but is \(response.statusCode)")
                print("response = \(response)")
                return
            }

            let responseString = String(data: data, encoding: .utf8)


            do {
                let json = try JSONSerialization.jsonObject(with: data, options: [])
                if let object = json as? [String: [NSArray]] {
                    print(object["predictions"]!)
                }
            } catch {
                print(error.localizedDescription)
            }
            UI {
                self.displayAlert(title: "Response received", message: responseString ?? "No message received")
            }
        }

        task.resume()
    }
Final product
I ended up with an iOS app that takes recordings and identifies the sounds in the recordings. Here is a screen recording of the app where I recorded myself whistling (video has no sound):
Summary
Overall, even though I was not successful in converting the machine learning model to an on-device version, I was happy with the end product of an audio identification app. Maybe the technology of on-device machine learning is not yet mature enough for use in all contexts, or maybe I'm just taking the wrong approach. Have any thoughts, questions, or suggestions? Leave a comment below!
References
- Hershey, Shawn, et al. “CNN Architectures for Large-Scale Audio Classification.” 2017 IEEE International Conference on Acoustics, Speech and Signal Processing (ICASSP), 2017, doi:10.1109/icassp.2017.7952132.